Wednesday, January 29, 2020
Homework #4
Complete the Recognizable shapes project described below. Also bring initial sketches for the 1st project to be looked over and discussed in class.
Recognizable Shapes
IN CLASS EXERCISE
Materials: ruler, strathmore paper pad, pencil, sharpie, fine or broad nib pen.
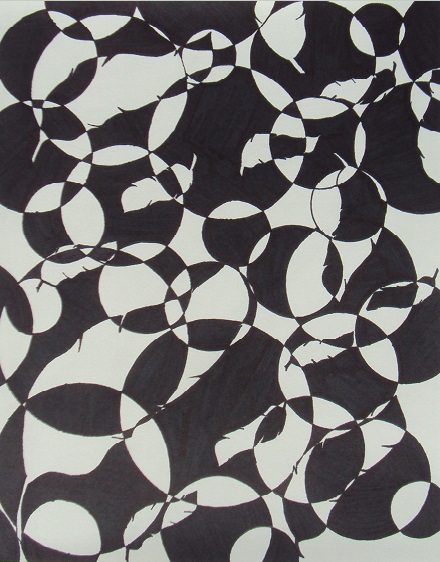
Shape: Choose a simple shape from a recognizable object that uses both curvy and straight lines.
Start by using your ruler and a pencil to map out a square that is 9x9 inches on a sheet of your strathmore paper. Divide your 9x9 square so that you have three vertical and three horizontal rows of 3 inch squares. You should have 9 total squares. Refer to grid below.
Left —> Right

Row1. A,B,C
Row2. D,E,F
Row3. G,H,I
Complete the grid following steps A - I. Only move onto the next square once the first is completed. Take your time and use your pencil to map out each drawing before you trace it in black ink.
Make your drawings as neat as possible. TIP: Before filing in your shape or negative space with sharpie, trace an extra layer of black ink with your fine pen to create a buffer to keep your lines crisp. This allows your sharpie to bleed without ruining the sharpness of your drawing.
A. Draw the silhouette of your object in the middle of your square with pencil. The outline/ silhouette will describe the object’s 2D shape. Trace the silhouette with your fine pen, erase pencil when ink is dry.
B. Repeat steps in “A”. When done, fill in the shape with sharpie so that the background is white and the shape is black. Your black shape should look like it is sitting on top of your paper, not integrating with the background. The shape is positive space and the background is negative space.
C. Repeat steps in “A”. When done, fill in the background with sharpie and leave the shape white. The background and shape should not be interacting. The shape of your object is still positive space and the background is still negative space.
IN CLASS EXERCISE
Materials: ruler, strathmore paper pad, pencil, sharpie, fine or broad nib pen.
Shape: Choose a simple shape from a recognizable object that uses both curvy and straight lines.
Start by using your ruler and a pencil to map out a square that is 9x9 inches on a sheet of your strathmore paper. Divide your 9x9 square so that you have three vertical and three horizontal rows of 3 inch squares. You should have 9 total squares. Refer to grid below.
Left —> Right

Row1. A,B,C
Row2. D,E,F
Row3. G,H,I
Complete the grid following steps A - I. Only move onto the next square once the first is completed. Take your time and use your pencil to map out each drawing before you trace it in black ink.
Make your drawings as neat as possible. TIP: Before filing in your shape or negative space with sharpie, trace an extra layer of black ink with your fine pen to create a buffer to keep your lines crisp. This allows your sharpie to bleed without ruining the sharpness of your drawing.
A. Draw the silhouette of your object in the middle of your square with pencil. The outline/ silhouette will describe the object’s 2D shape. Trace the silhouette with your fine pen, erase pencil when ink is dry.
B. Repeat steps in “A”. When done, fill in the shape with sharpie so that the background is white and the shape is black. Your black shape should look like it is sitting on top of your paper, not integrating with the background. The shape is positive space and the background is negative space.
C. Repeat steps in “A”. When done, fill in the background with sharpie and leave the shape white. The background and shape should not be interacting. The shape of your object is still positive space and the background is still negative space.
D. Draw the silhouette of your object (in pencil) so that it is not at the center of your square and has a different orientation than your previous drawings. Trace the silhouette with fine pen. Fill shape in with sharpie, erase pencil when dry.
EVALUATE: Which drawing of your shape stands out the most? While B and C have 50/50 contrast, D is more surprising in it’s orientation and will keep the viewer looking longer.
E. Draw three of the same shape in pencil where two of them overlap each other and one is cropped out of the picture plane. Trace the total outline of your shapes, and remember, when two shapes overlap they become one shape in this positive and negative exercise. When tracing your overlapping shape, think of it now as one shape that looks different than the original. Make background black with sharpie.
F. Draw a total of 7 shapes in pencil. Have them overlap with each other and the border in some areas. At least 3 shapes should be exaggerated in size, either very large or very small. Map out the new shapes made from the overlapping ones to determine what silhouettes are in your square. Trace silhouettes of shapes in pen and fill background in with sharpie. Erase pencil when ink is dry.
G. Draw 3 diagonal lines using your ruler and a pencil starting from the top left corner to the bottom right. They should be equally spaced apart and your square should now be divided into 4 parts. Make a drawing on top of your diagonal lines following the rules of “F” but do not consider the lines when making your composition. Pretend they are not there. When done label in pencil each row’s background alternating from black to white. For example, first diagonal will be B for black, second W for white, third B for black, fourth W for white. Now trace the shapes in each section so they are opposite of the background you assigned to them. Do one row at a time so you do not get confused. This will split some shapes down the middle so trace carefully and go from one diagonal section to the other. Your shapes will now not be only determined by how they overlap, but also how the background assignment changes. You will have even more unique shapes than the previous drawing.
H. Draw 3 vertical but curvy lines that make unique waves in pencil. This will divide your square into 4 parts. Make a drawing on top of your lines from prompt “F” and follow steps in step G to complete.
I. Now make a drawing that evokes the feeling of your shape. Use what you know about line variation to articulate your feeling. The feeling is more important than the recognizable shape, so use it only to reinforce the feeling made by other drawing elements. Remember your recognizable shape is a dominate symbol. It can get your viewer to look but feeling is needed in order to get them to stay.
EVALUATE: Which drawings of yours are the most dynamic in their visual elements? What elements in your drawings create a complex composition? Which drawings are the least?
Monday, January 27, 2020

Tuesday, January 21, 2020
Homework #3

Also do the shape reading in the files section on canvas.

Wednesday, January 15, 2020

Tuesday, January 14, 2020
Hmwrk #2
In class students will create various types of lines experimenting with various tools, marks, qualities
of line such as thick/ thin, even/ uneven, broken, intersecting, fast/ slow, curved, rough, clean, straight,
dripping, or repeated. As you create these lines think about how the variations affect your reading and
interpretation of the line itself created. Ask yourself:
of line such as thick/ thin, even/ uneven, broken, intersecting, fast/ slow, curved, rough, clean, straight,
dripping, or repeated. As you create these lines think about how the variations affect your reading and
interpretation of the line itself created. Ask yourself:
What kind of motion is created?
Is this a quick reading or slow or rather, how does the eye travel over the page and follow the line?
What type of mood is conveyed by the line? Is this a universal reading or mor4e subjective? Why?
How does the line interact with the edge of the page?
How does the line interact itself?
What kind of tension or noise is created?
What kind of energy is created by the line?
Is it rough, clean, how would you describe the line? What mood does it convey?
Once each student has made 15 to 20 different line experiments they hang them around the room so their
peers can study and discuss the drawings. After looking over the different lines students should photograph
various peer’s lines from the drawings around the room. You can photograph portions of the whole of the lines.
Experiment with different levels of zoom and detail. Try to get a good variety. Take somewhere between 40 and
50 photos so you have plenty of material to work with. In addition I would like you to take 20 more photos
outside of class of lines you find interesting in our day to day lives. These can be in your room, liacourse walk,
center city, or wherever you find interesting lines. Don’t screen grab or go online for these take the photos yourself
as you move about throughout the day.
Once you have photos to work with you will create two collages. One static, one dynamic. Use the 9 x 11 bristol
pads and glue sticks or craft glue for base of these collages. You will then cut and paste different aspects of these
photos to create your new image. You do not need to print all the photos but I would like you to use a t least 20
per collage., pick your favorite after spending some time studying them. Please use only black and white imagery.
Make sure you consider composing the entire page in each collage. Think about how the eye is moved throughout
the piece. Think about the Visual Dynamics reading from homework. Stop and consider as you work. Change a
decision if it is not working. I would like you to use at least 20 photos per collage. Feel free to use more if desired.
These collages will be due 1/22.
Sunday, January 12, 2020
Homework #1
For Wednesday read the pdf titled Visual Dynamics: Moving the Eye Through 2D design linked in the files on Canvas and bring in an image you feel does a good job of using visual dynamics.
Also bring in 5 various objects/ materials such as forks, sticks, pasta, old wigs, strange objects, or anything you can dip in ink and make interesting lines with.
Subscribe to:
Posts (Atom)